Want notifications about this course?
By entering your email you agree to receive marketing emails from Consonance.
10:00 Welcome. Contents
Introductions, and the scope of and plan for the day.
Welcome to the training day!
You do three fundamental things in Consonance: get data in, improve it, and get it out – all so you can sell books more effectively. Often the ‘get it out’ stage looks like ONIX messages to your trading partners, or spreadsheets, or feeds to other computers. Today, though, we are looking at getting your data out in a beautiful, human-readable format – marketing material PDFs.
It’s worth saying that it’s the exact same data in the PDFs and the ONIX xml. When we say Consonance is your ‘one version of the truth’, that is literal. There’s one database entry for each data item. So you can trust that what appears on the PDF is the latest data as entered by you and your team.
We will be aiming to produce aesthetically pleasing materials in an automated way, so as well as saying what data to put on the PDF, we are going to be able to define and apply styling – font choices, colours, layout dimensions and fixed artwork such as headers and footers.
Consonance is not sold by the module, but by the named user, so, if you are a Consonance client, everything you need to follow this training course is already included and activated on your account – no additional set-up or billing needed.
We are going to start with a bang, and create our first flyer in the next few minutes. Then we’re going to drill down into all the details that enable you to configure marketing materials so they do justice to your hard-won expertise on the most effective layouts for your materials.
Let’s get started!
Video 1: Find and open the documentation [03:57]
(If you’re reading this page, you have already found and opened the documentation. Congrats!)
10:20 A 20-product flyer, in 10 minutes. Contents
We’ll burst out of the starting gates and straight away create a useful flyer of 20 products. This will give us the big picture – an overview of how Consonance can take your data and repurpose it into a useful sales asset.
-
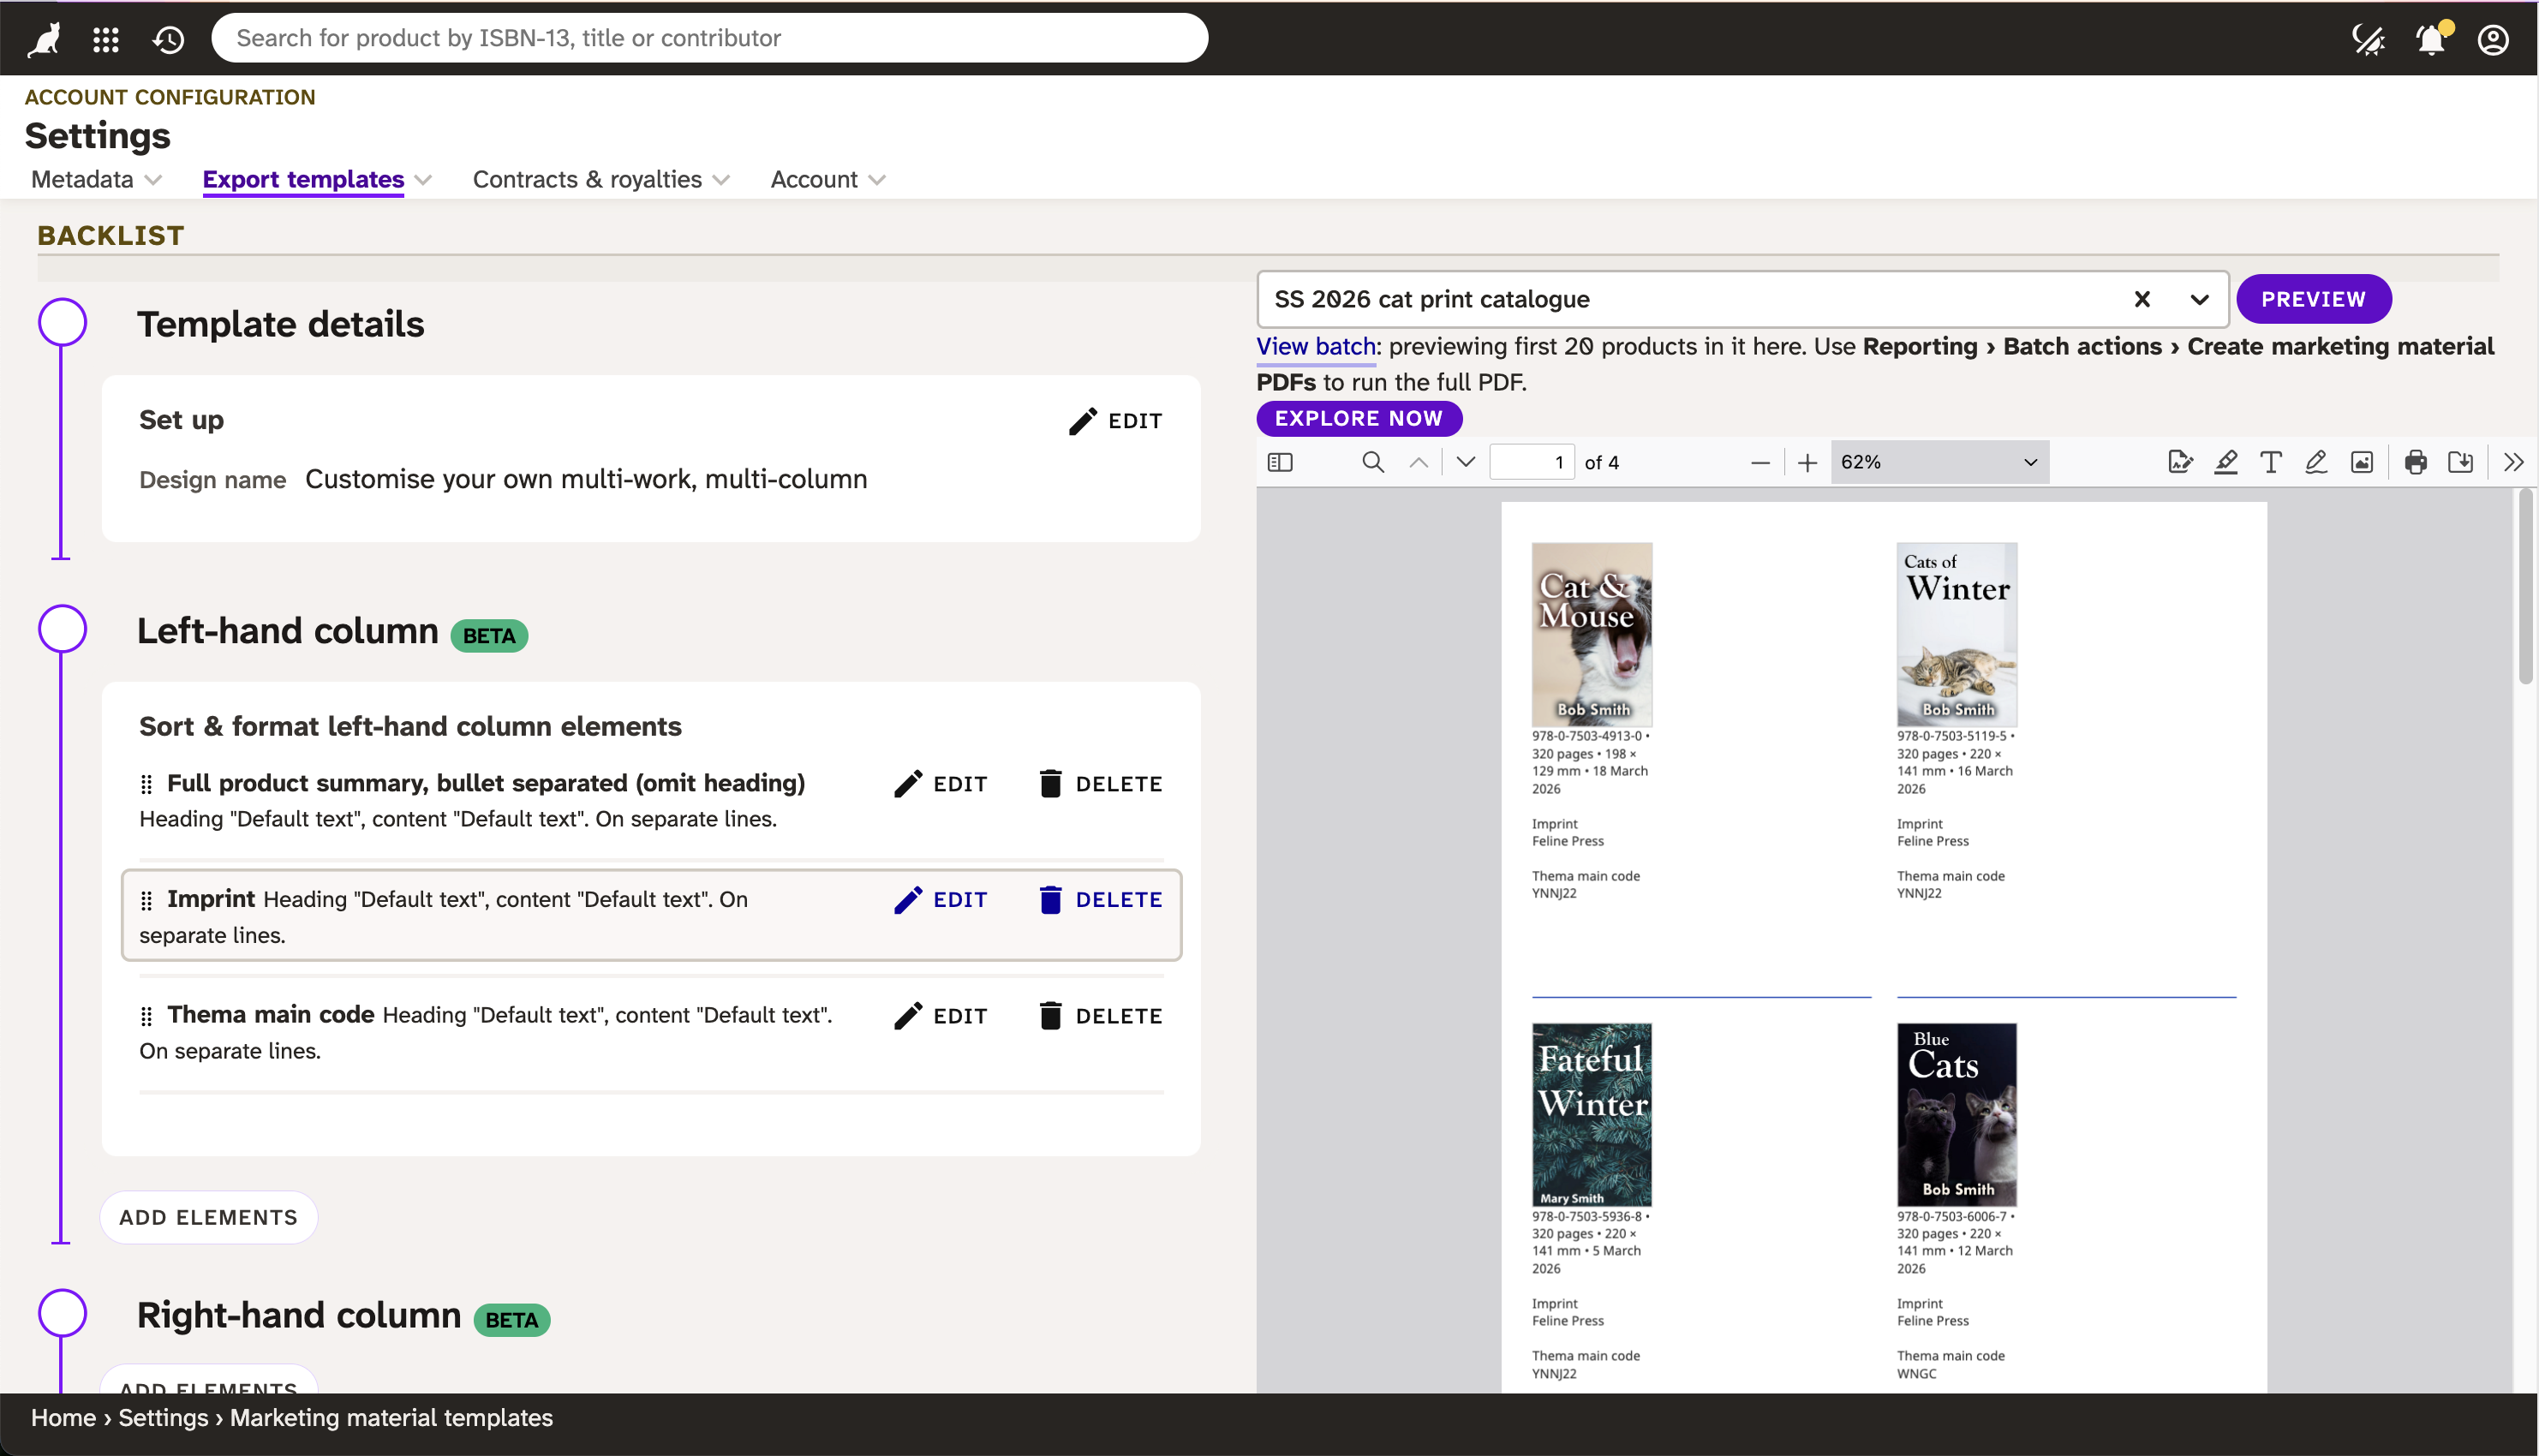
Navigate to the Marketing materials templates list page.
Go to Metadata › Marketing material templates ⤴. Click Add template. Give it a name – maybe “[Your name]‘s first flyer” – and choose the design name “Customise your own multi-work, multi-column”. Click Save and click the link that appears in the list to go to the edit page of your new template. Optionally, choose a batch from the preview dropdown.
-
Customise the layout.
Scroll to the “'Customise your own’ layout options” region. Click the Edit button. Make the following changes:
- In the Number of records to display per page field, type 8.
- In the Number of columns per page field, type 4.
- Move the cover width slider all the way to the right.
- In the Pagination starting number field, type 2.
- In the Pagination style field, choose Named bottom left.
- Click Save.
-
Add some metadata.
Scroll up to the “Left hand column” region. Click on the Add Elements button and do the following:
- The cursor will be flashing in the filter. Type ‘summary’ and the list of possible options whittles down to give just four options. Check “Full product summary, bullet separated”.
- Click Save.
- The “Left hand column” region shows your saved element. Click the Edit button.
- Delete all the text in the field labelled “Heading text”. (It says “Leave blank and save to omit the heading entirely” and that’s what you’re doing).
- Click Save.
-
Review the results.
Look at the right hand side of the page. There is an embedded PDF with 20 of your products.
What just happened? Contents
We created a multi-work flyer, very quickly. Let’s break down what we did. Then, we’ll think about further configurations for our PDF.
We have achieved a number of things in those few minutes.
- We said many works should be on each page.
- We said how many columns the works should be in.
- We said what data should accompany the cover.
- We set pagination rules.
We also learned that the place to set up templates for your PDFs is in Settings, and that you can create new templates yourself.
We didn’t do some important things, though:
- We didn’t get to choose what works should appear on the PDF.
- We didn’t get to choose the fonts or colours.
- We didn’t get to choose what order the works should appear on the PDF.
- We didn’t get to include all the data for the products on the work – just one product.
- We didn’t get to choose what data to add, aside from a metadata summary.
So there’s plenty more to cover. We will take a short break at this point just so everyone has the chance to shout if there are any issues so far. Then afterwards let’s add another template, and this time add even more information. If you come back before 11:00 and are waiting, it would be fruitful to look at each field on the page, click on the info icons and read the instructions, to get really familiar with the page.
Please raise your hand with any questions at this point, and one of the Consonance team will use the Zoom chat to check in and get you on track.
A more complex multi-work template. Contents
Welcome back. We’re going to repeat the steps from earlier to create a new template, and then start to add more detail in to build this template up from a quick demo to a serious piece of marketing collateral. Let’s get started.
-
Navigate to the Marketing materials templates list page.
Go to Metadata › Marketing material templates ⤴. Click Add template. Give it a name – maybe “[Your name]‘s Second flyer” – and once again choose the design name “Customise your own multi-work, multi-column”. Click Save and click through to edit your new template.
-
Customise the layout.
Scroll to the “'Customise your own’ layout options” region. Click the Edit button. This time, add the following information in:
- In the Number of records to display per page field, type 4.
- In the Number of columns per page field, type 2.
- Move the cover width slider to the approximately half way point.
- In the Pagination starting number field, type 2.
- In the Pagination style field, choose Named bottom right.
- Click Save.
This new layout is going to give us some more room to add more data.
-
Add some metadata.
Let’s repeat our earlier steps from the previous flyer and add some data. This is exactly the same as last time. Scroll up to the “Left hand column” region. Click on the Add Elements button and do the following:
- The cursor will be flashing in the filter. Type ‘summary’ and the list of possible options whittles down to give just four options. Check “Full product summary, bullet separated”.
- Click Save.
- The “Left hand column” region shows your saved element. Click the Edit button.
- Delete all the text in the field labelled “Heading text”. (It says “Leave blank and save to omit the heading entirely” and that’s what you’re doing).
- Click Save.
Now, let’s do something new, and add another data element. Still in the “Left hand column” region, click on the Add Elements button and do the following:
- The cursor will be flashing in the filter. Type ‘imprint’ and the list of possible options whittles down to give just one option. Check “Imprint”.
- Click Save.
- The “Left hand column” region shows your saved element. Click the Edit button.
- Delete all the text in the field labelled “Heading text”. (It says “Leave blank and save to omit the heading entirely” and that’s what you’re doing).
- Click Save.
-
Reorder your data elements
Next, let’s reorder our data elements. Drag and drop the elements to put them in the order you want.
-
Stretch goal!
If you want, add in a new data element of your choice. You might choose one of the following: use the filter to find it, check its box and press save.
- Thema main code
- Illustrations note
- For sale in
- Keywords
Configuration options. Contents
We amended “Heading text” but there are more options available on every element. Let’s go through them. Click to edit one of your elements to see these options.
Video 4: Configuration options [10:11]
- The first option is Vertical space before. This lets you add, well, vertical space before the element’s header or, if it’s been left blank, the content of the element.
- Display inline, on separate lines or as table cells? “Inline” makes the heading and content appear on one line. “As table cells” draws a two-column, single-row table with invisible borders, with the heading in the first cell and the content in the second. It means you can align the heading left and the content right, but tables have less flexibility in rendering HTML content, so some styling may be removed (bold, italic and bullet points are OK). “On separate lines” presents the content on a separate line to the heading. Set as “inline” if you want the text to be closer to its neighbours as this option includes some padding. A trial and error approach can work quite well for this.
- Insert a space between heading text and content – so if the heading text is “$”, a space results in “$ 8.95” vs. “$8.95”
- You might use free text to add the word “pages” to an extent element. You might use Insert a space between content and free text to add a space before “pages”. If, however, you want the text to be “pp”, you would uncheck this box.
- As well as suffixes such as “pages” or “pp”, you could use free text after content to add in completely free-form text after an element, such as a promo code.
You can also upload header banners and footers. For today, right mouse and save the following images to your computer, then upload them to your page.


When you’re working on a template in the future, consider turning on the “show grids” option temporarily in the ‘Customise your own’ layout options region to get a sense of how your number of columns and number of products choices will sit on the page. Try 6 columns / 18 products, or 3 columns / 12 products.
Styling. Contents
Let’s gain control over the look and feel of our PDF.
Video 5: Styling [15:21]
Look at the preview. It’s currently using the default styles, but we can change that. Here’s how it might be looking:
The Imprint label there could be styled for better impact, so that’s what we’ll do next. Once we know about both data elements and styling, we’ll proceed to adding some more data into the space on the right.
We are going to create a new style for the Imprint label, and then apply it to our template. So let’s go to the styling page where we will see how to amend fonts and colours. We will create a new style, to make the label ‘Imprint’ be all caps, slightly spaced, in a nice high contrast gold colour, to form an elegant running header.
-
Define the style.
Let’s repeat our earlier steps from the previous flyer and add some data. This is exactly the same as last time. Scroll up to the “Left hand column” region. Click on the Add Elements button and do the following:
- Open another tab with Consonance in it. To do this, duplicate the one you’re on.
- Go to Account › Settings › Export templates › Text styles ⤴
- Click the Add text style button. A new record appears on the top row.
- Click the style name link, top row, first column. Give the style a name of your choice, such as ‘Metadata header’. Click Save
- Click the font name link, top row, second column. Choose a font of your choice. When you click Save, the final column gives you a preview of your choice.
- Click the colour link, top row, third column. Choose a colour of your choice. When you click Save, the final column gives you a preview of your choice. The penultimate column, labelled WCAG AAA contrast check, tells you if the colour at its present size has high enough contrast to pass basic AAA standards. Amend the colour until it passes.
- Amend style, font size, leading and alignment if you want to.
- Click the character spacing link and set it to 1 or 2 pt, as you prefer. Click Save.
- Finally, click the transform link and choose Upcase from the dropdown. Click Save.
- Make any final adjustments according to your preference, using the final column preview as a guide.
Apply the style
We have a style: now let’s apply it. Go to your other open tab that has your template, and do the following:
- Click to edit the ‘Imprint’ element in the Left-hand column region.
- Choose your style from the dropdown labelled Heading style.
- Click Save. When the page refreshes, you will see your style applied to the “imprint” label on the PDF.
That’s the fundamental process of styling: I shall now be annoying and say ‘The only limit is your imagination!’ After which you think ‘Oh no,’ because creativity is the hard bit! Here, then, are some ideas for marketing material design: nothing to do with Consonance, and not a requirement, but ideas which will help you to produce professional-looking materials.
- Line things up. If your content is aligned left or right, it will be easier on the eye.
- Whitespace is useful, to a point. Separate data elements with whitespace rather than lines, but don’t be so gappy that your layout loses cohesion. It’s easier to judge the balance if you start with too much whitespace, then reduce it, rather than too little.
- Use font weight for emphasis, rather than font size. You don’t need your data hierarchy to be represented as font size. Even though a data label might be more important, in the hierarchy, than its content, don’t feel you have to make the label bigger than the content.
- Use colour sparingly A bright, high contrast line colour and bullet point colour adds a pop of colour and guides the eye. Making your entire table of contents green just looks weird.
At the end of today we’ve got some time to work individually on our templates, and I’ll give you the option to use some pre-made templates, if that helps to get you going. I also recommend finding your previous catalogues, and re-creating them in Consonance.
Break and ‘homework’. Contents
What a lot we’ve achieved: setting up templates, adding data elements, and styling.
Video 6: Homework [16:31]
We’re taking half an hour to 45 mins for lunch. Before we come back, I’d like you to take 15-30 mins to try the following:
- Add some data elements in to the right hand column. I’d suggest the title, a list of contributors, and the short description.
- Create another text style, and apply it to the title’s content (watch out: there’s one field to apply a style to a header, and a different one to apply it to the content). You might want to make it a larger font size, a heavier font weight, and perhaps a different font entirely.
We shall be around on Zoom for questions and if you get stuck. Then when we come back, at 1pm, we’re going to spend the afternoon using our template. We’ll set up batches and generate a catalogue; we’ll run ad-hoc reports to produce flyers, and more.
See you in a bit!
The plan for the afternoon. Contents
This afternoon we’ll put our template to work.
Hopefully you have had a chance to play on your own and added a few more data elements and styles in. Perhaps you noticed:
- All the data elements are available in both the right and the left hand columns.
- The data elements are identical to those used to set up spreadsheet custom reports.
- The text styles are at “client” level and are editable and useable in more than one template, by more than one team member.
- The templates are editable and useable by all team members.
- If you choose a data element whose content contains HTML, the PDF will process and style the markup rather than putting HTML tags themselves on the page.
Did you notice anything else? Any questions on what we’ve covered so far? If some team members should be blocked from being able to edit, let us know (support@consonance.app) to discuss configurations on your account.
Next stepsThe plan for the rest of the afternoon is, first of all, together use our templates by running reports to get the list of products we want in the catalogue. This might require a degree of brainpower, so we’re going to do this first whilst you’re moderately fresh. Then we’re going to loop back and look further at how to configure, style and arrange data elements, which is easier on the brain and adding layers to what we’ve already covered. Basically we don’t want to leave the hard bit until last, when your brain is completely spent!
Exporting a PDF catalogue. Contents
So far, we have viewed a preview of what our template emits on the template page. Now, we’re going to apply it to a set of products of our choice.
Video 7: Exporting a PDF catalogue [12:18]
- Go to Data Studio. Click on New search.
- Add a sear…
Hm, what should we search for?! What are the products that go in a catalogue? Of course, ‘it depends’.
- It might be an imprint catalogue, in which case your search might be
Works - Imprint › Include any of › [your imprint name].- It might be a season catalogue, in which case your search might be
Seasons - Name › Contains › Summer(which would work if you have set up a season called e.g. ‘Summer 2026’.)- It might be a subject catalogue, in which case your search might be
Subject codes - Name › Contains › Cats- It might be a date range catalogue, in which case your search might have multiple conditions:
Products – Publication date › On › Quick date next quarterand then you might want to omit some outliers.
We will do this last option now. So:
- You are in Data Studio. You have clicked on New search.
- Set the first filter to
Products – Publication date › On or after › Fixed date 01-01-2026 - Set the second filter to
Products – Publication date › On or before › Fixed date 01-06-2026Feel free to substitute in dates for your list that make better sense!
- Click Search. If you get zero results, refine your filters until you get some products back. If you get more than 500 products in your results, add a further filter to whittle it down a bit, just to keep this training session’s pace going!
- Click Switch to…. Click Refine results by product. Check the boxes against any products you want to omit and click Exclude selected.
-
Now you’ve got a list of products to go in your catalogue.
- Click Switch to… and this time click Batch actions › Create marketing material PDFs.
- Choose your template from the Marketing material template dropdown.
- Choose how you want the products to be sorted, from the Sort by dropdown.
- If you want the PDF’s entries to be at product level, leave the Work-level PDF lead product field blank, and click the Create button. This will produce one product per entry on the PDF, for each product that appears in your search results. If you want the PDF’s entries to be at work level, which means all the products of the work that are in your search results appear grouped, as a work, choose the lead product from the this dropdown, and click the Create button. This creates one work per entry on the PDF, including its products’ details.
So far we’ve looked at multi work templates, but you can have single work templates, too. If you were to choose sort order options for a single-work PDF, the individual PDFs will be generated in that order. The lead product option works the same on the single and multi templates.
- Wait for Consonance to build your PDF. The Notifications icon changes when it’s ready. Download it and have a look.
Dealing with real data. Contents
You’ve just exposed your lovely template to real data. There’s a high chance that your PDF contains some little red boxes with a plus in them. Let’s work on accommodating your real-world data.
Video 8: Dealing with real data [11:54]
When we’re creating multi-work templates, which is the only sort we’ve worked on so far today, Consonance gives you a finite amount of space for each entry. It’s different on the single-work templates, where Consonance keeps adding page after page to the PDF until all the content is printed. Your design needs to take into account the data it’s going to have to handle. This can work as quite a useful data consistency check. If you have short descriptions in Consonance which are 500 words long, not only are they not going to fit in their PDF box – they’re going to possibly be silently rejected by trading partners, retailers and other data recipients.
When content won’t fit, Consonance adds the red box with a plus. Click on it, and you’ll be taken to the bottom of the PDF where you’re told what the problem is. You can send this PDF to another Consonance user to fix the data, because the links in the error log point back to your Consonance account.
Single-work templates. Contents
Single-work templates have a few different options.
Video 9: Single-work templates [09:34]
Single-work templates share a lot of the same configuration options as multi ones. We’ve focussed this training course on the multi ones as they are more complex. But let’s have a look at the differences.
Add a new template, and this time choose the design name “Customise your own single-work, two column”. Click to edit it.
There’s a region called Content tiles. Use it to customise whether you want reviews included as a block; whether you want to see related works as a block; whether you want to group ebooks together and audiobooks together as a block when you choose to have your PDF at work level rather than product level.
There’s an additional option “cover position” in the images region. Use this to optionally right align your cover.
You can also define a single-work PDF to be used as a briefing template. On any work, go to Project management > Briefings, and you’ll be able to choose a template from the dropdown.
Break Contents
We’ll have a break until half two.
Advanced sorting. Contents
Catalogues and flyers need their entries to appear in the right order, and sometimes it’s not as easy as ‘by subject, then by pub date’.
Video 10: Advanced sorting [10:05]
Say you want to sort by… well, just how you want to sort. There’s no logical trick – you just want this book there, and that book there, no questions asked. To do this, save your results as a batch, sort the products in it, then if you search by batch Consonance will give you the option to sort your PDF entries by the batch order. Let’s step through that now.
- Click Switch to… .
- Choose Batch actions › Publishing › Create batch. Give it a name and click Create batch. When the batch saves, click on its name to go to the batch.
- Order the products by dragging them up and down the page as relevant, or use the buttons to achieve the same effect e.g. Sort A-Z.
- Return to Data Studio, create a new search, and add a filter
Products – In batch > Include any of > then choose your batch. Click Search to run the search. - Click Switch to… and this time click Batch actions › Create marketing material PDFs.
- Choose your template from the Marketing material template dropdown.
- Choose how you want the products to be sorted, from the Sort by dropdown. This time you’ll see an option called “Batch order”.
A real template. Contents
Let’s make sure you’ve got a template ready for use tomorrow, next week and thereafter.
Let’s leave Data Studio for today. This last session is a full hour, and is your chance to leave this training course with a detailed template that you can use tomorrow. Let’s get started.
Try to put into practice what we’ve learned, and set up a new multi-work template of your choice on the marketing materials templates page. We shall be around for help so send your questions and messages in the chat! We can go over the same things we’ve already done, if your mind has gone blank, or help on new problems.
Option 1: edit a pre-made template
If your artistic, designer side is holding you up, we will make available some pre-made templates in your Consonance account, for an advance information sheet, a catalogue, and a flyer. If you do not want these pre-made templates, pop a note in the Zoom now.
Option 2: replicate one of your previous templates
Alternatively, I recommend looking at your previous catalogue layouts and attempting to replicate them in Consonance, so you are thinking about one thing at a time (making the layout, not designing it as well.)
Option 3: continue to build on the template we made earlier
Or you can carry on adding data elements and styling, and get a feel for how much space you need to allow for.
Close, feedback, next steps. Contents
That was a proper day’s work! Please let us know any and all feedback (too much content? too little content? How was the structure and pacing? Do you now feel like you know how to get PDFs out of Consonance?) and if you have created a flyer or other PDF that you would be happy to share, then do shout on this Zoom, or follow up with me on the helpdesk later. If you can fill in this feedback form, that would be great! Thanks for spending your time to understand more about the tools in your account: we hope it will reap dividends.
Remember: “Consonance” means “harmony”, and whatever harmony we can bring to your workflows, we’re here for it! So let us know what other training days you’d like, and let us know any more ideas sparked by today’s course for features that would help you.
Contents
- Welcome
- A 20-product flyer, in 10 minutes
- What just happened?
- A more complex multi-work template
- Configuration options
- Styling
- Break and ‘homework’
- The plan for the afternoon
- Exporting a PDF catalogue
- Dealing with real data
- Single-work templates
- Break
- Advanced sorting
- A real template
- Close, feedback, next steps